

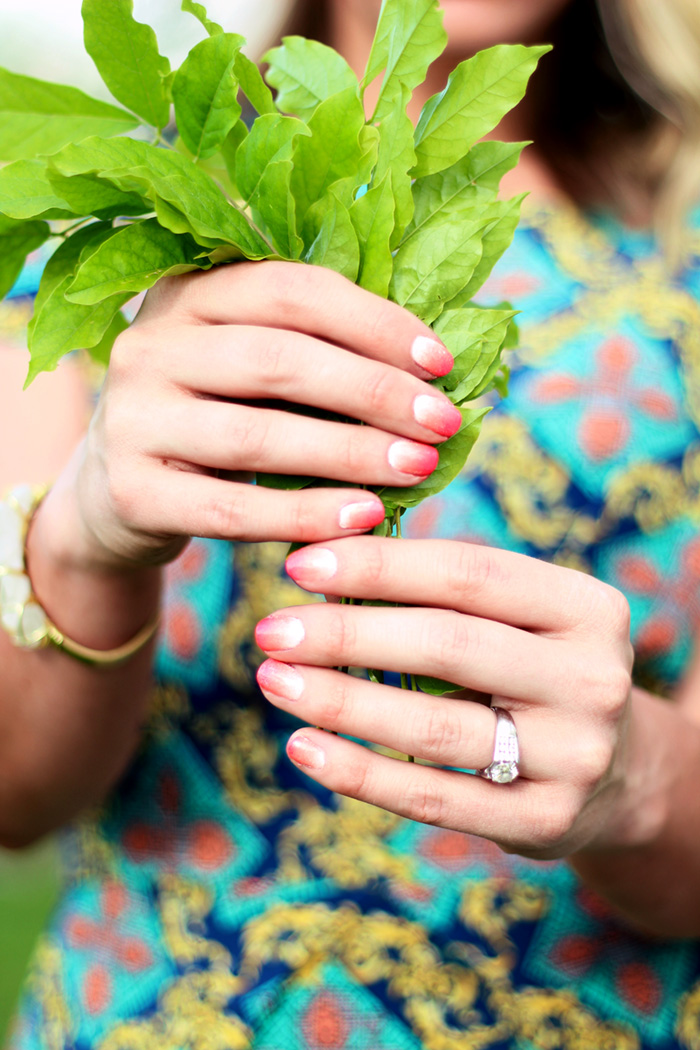
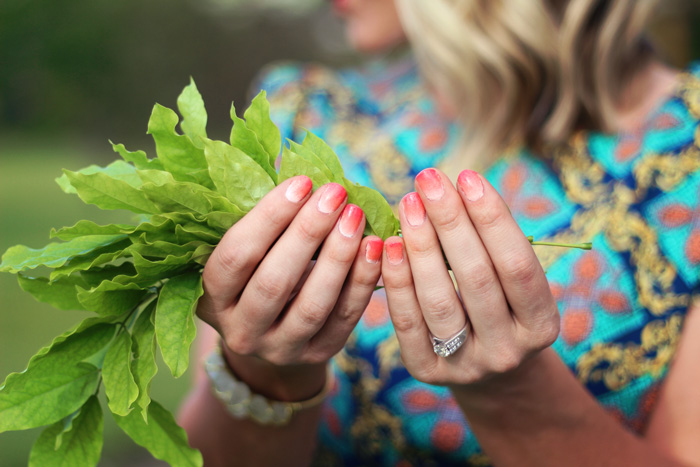
You guys. I’m obsessed. I don’t know what it is but I’m all of a sudden in love with nail art. I was really nervous to try the ombre because well, I’m not super skilled… yet haha! I thought it looked really hard and I knew for sure I was going to be all sorts of frustrated with it. WELL HOLY CRAP. IT’S soooooooooooooo EASY! If it weren’t for the fact that you have to re-apply polish to the sponge after each nail, it would literally take less time than painting your nails a solid color. Because you’re using a sponge and allowing air into the paint, your nails dry SUPER fast. No waiting around with this one- I love it! What do you guys think?!
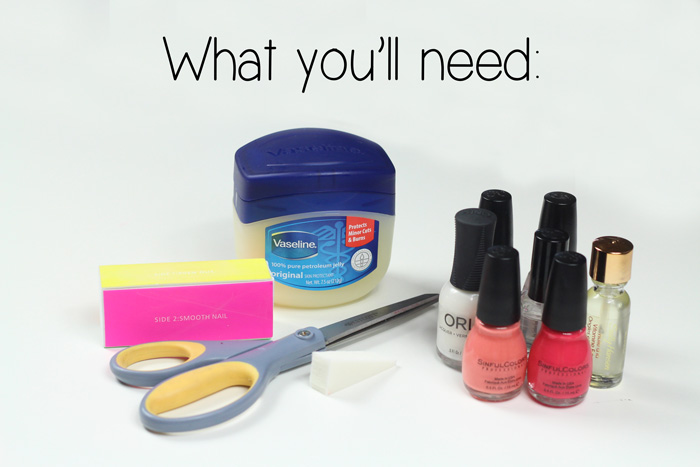
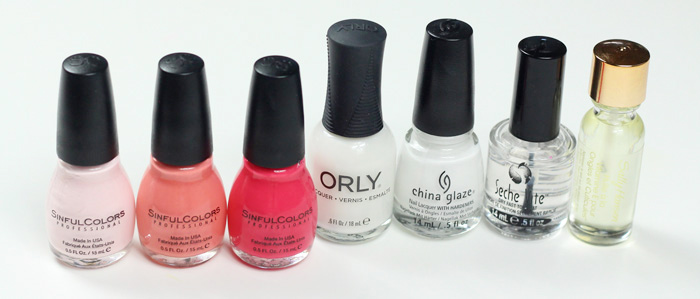
You’ll need::
1:: a base coat — I’m really loving this one. It has a hint of white to it so it helps the colors pop. Using a base will help the color stay on longer
2:: white polish — I bought this one from China Glaze. I haven’t decided if I love China Glaze polish or not. It’s really thick so it can sometimes be hard to put on, but the color is really great
3:: three coordinating colors. Mine are, from lightest to darkest, Sinful Colors Easy Going Hazard and Thimbleberry
4:: a top coat. BUY THIS ONE. You won’t regret it. It’s amazing. Dries super fast, keeps the nails looking crisp for DAYS!
5:: Makeup sponges
6:: Scissors
7:: Vaseline (optional)
8:: Cuticle Oil (optional)
::STEPS::
1:: Apply base coat – let dry
2:: Apply one coat of white – let dry
3-4:: Cut a makeup sponge to fit your nail
5:: Apply vaseline around your nails, it’ll help the nail polish come off your fingers
6:: Get your three colors ready and then apply a row of the lightest color onto your makeup sponge. You want there to be enough that it looks wet
7:: Apply the next color to the middle
8:: Apply the darkest color to the top
9-10:: Blot the makeup sponge onto the nail a few times until the entire nail is covered. You’ll see how easy it is once you’re doing it!
11:: Finish all the nails, re applying color after EACH nail
12:: Once it’s all dry, apply your top coat
13:: Dab a q-tip into some nail polish remover and clean up the cuticles. Apply cuticle oil if desired

Ombre is my favorite kind of all designs. I would do it no matter when and no matter what color it would be. I’ve also seen https://nailartstyle.com/ombre-nails where are a lot of nail designs.
interesting article
is this easy
Hej Abby!
I really love your page and this ombre nail art caught my attention quite fast. So I did it, not with coral but more brown/muddy colours 😉 Check out my post and look at how it turned out for me. Thanks so much for sharing, I will definitly try some of the braids 🙂
Love, Lisa-Marie
So for checking out my post you have to click on the name. I know that you, Abby, now that. But I wouldn’t have so I wanted to point it out, if anyone else would like to look. Thanks so much.
Abby I just listened to your soundtrack and it is absolutely beautiful!! Well done! Your voice is so beautiful. Is the only place for purchase on iTunes? Thanks!
Hi Whitney! Thanks so much, you are so sweet!! You can purchase it on Amazon too or you can buy a hard copy from me — it’s just in the shop!
The designs given in this page shows very cute designs. And the steps given in this page is very helpful for us to follow. Thanks for sharing these information with us.
Slick!