

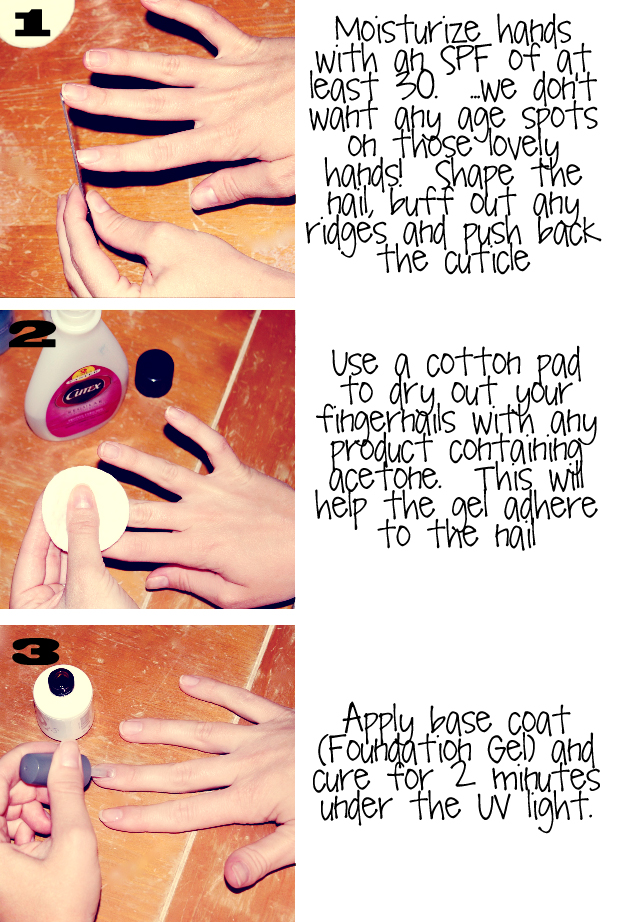
I love going to the salon as much as the next girl. It is just so dang expensive! Brian surprised me with a night off and told me to go get a pedicure. As I was watching the lady do my toes I was having major anxiety. I was definitely excited about getting pampered but I knew we just couldn’t afford it. As I handed over my $45 I nearly ran for it! FORTY FIVE DOLLARS!! AHHHH! Of all the things we should have been spending our money on- gel toes was not one of them. When I got home I did a little research. I crunched a few numbers and impulsively bought what I needed to do my own gel nails.
I bought the Gelish Basix Kit for $27. I’ll just say right now that buying the kit is unnecessary. There’s a bunch of stuff in the kit that you don’t need and the kit was MINI size. Geesh.
What you need to buy: Total- $57.85
- Foundation Gel $10.81
- Top it Off $9.56
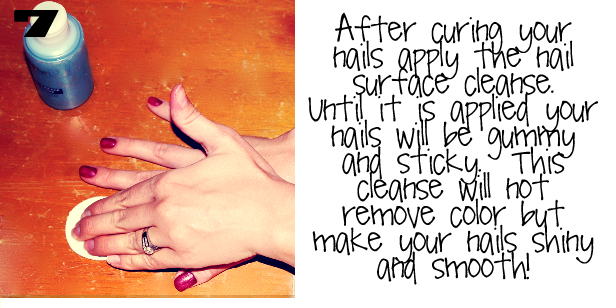
- Nail Cleanse $7.50 (check out comments. rubbing alcohol should work just fine!)
- UV Light $29.98
That is one and not even a half times getting your toes done at the salon. Like I said, Gel toes are $45 at our salon.
What you probably already have:
- Nail polish remover with acetone, or alcohol
- Nail file and clippers
- Cotton pads
- Nail color of your choice. I purchased a gelish nail polish but I was talking to my cousin who does nails and she said any nail polish will do. I’ll try regular nail polish next time and see if it lasts as long
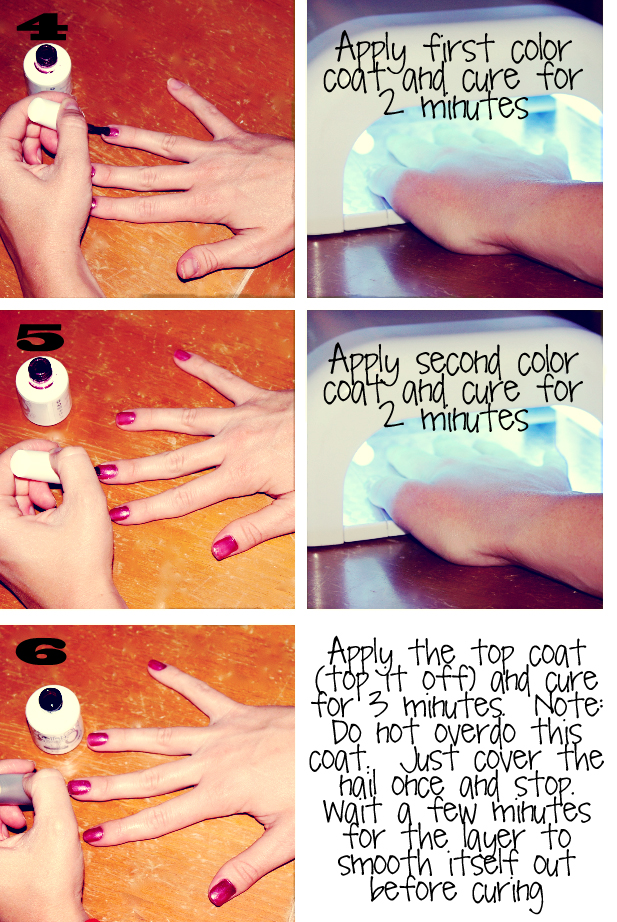
I’m really sorry about that table I took pictures on. It needs to be chucked. Anyway! These gel nails looked perfect for two weeks. I’m not kidding.
THEY LOOKED PERFECT FOR TWO WEEKS!!!
Bathing kids, doing dishes, cleaning tubs and counters… Lets just say my nails go through a lot. And the days of me painting them with regular nail polish were over. Regular nail polish lasted maybe two days- if I was lucky. And it just wasn’t worth the time. I am so excited about these gel nails I cannot even tell you!
The UV light cures the paint instantly so you don’t have to wait four hours for your goopy nail polish to finally harden. I’d fall asleep with my toes wet with regular nail polish and in the morning they would look awful. With the gel nail polish it’s 15 minutes of painting and curing and then you’re done. They’re hard and they look fantastic.
REMOVING GEL
You might want to get some artificial nail remover. I looked at the ingredients and it seems like you could get away with regular grocery store acetone nail polish remover. I wore my gel nails long enough that they started peeling off on their own. My gel toes that the salon did were a BUTT to take off. It literally took me two hours of peeling and clipping away at the gel and I still couldn’t get it all off. Luckily the salon gel and the gelish gel is much different. I didn’t have a problem getting the gel I put on myself off. If that makes sense! So. If you do this on yourself maybe try removing your gelish gel nails with regular acetone remover before buying the gelish artificial remover. I’m not sure that it’s necessary.
Any questions? Was that totally confusing? If it was ask away and I’ll do my best at clarifying things up!
Thanks for the post. I get here Very helpful information. Excellent blog right here! I was just searching for this information for a while.There is obviously a lot to know about this. I think you made some good points in Features also. I have been using latest collection of gel nails kit and I really satisfied.
– Cindy xoxo
i just ordered my gelish nail set and did my gel nails and they look amazing!!! Thanks Abby for all your awesome posts and ideas.
I also saved money by using regular nail polish and rubbing alcohol like you suggested 🙂
You can order the items off of amazon.com. Also the nail cleanse (the blue bottle) is unnessary. Rubbing alcohol does the same. Use the rubbing alcohol before to dry out the nails and clean off oil residue. Then use the alcohol after to remove the tacky sticky texture
I have also found that regular nail polish doesn’t lay as well and is harder to remove
I will be trying this asap. I get my nails done every 2wks and with gel..it’s so pricey. Now I can do it myself. Thanks
Thanks for all your helpful hints!! This is the second time I’ve done it so I’m definitely not a pro. It was so much fun though I just had to share how easy it was with all those non gel users ha ha!!
I’ve been thinking about buying a UV light, but I wasn’t sure how it would be worth the money. Well it looks like it is! Thanks Abby, great post 🙂
https://beautifullydangerous.blogspot.ca/
You are so awesome! i really can’t even paint my own nails without them looking like a 2 year old did it!
Great post, as usual, Abby. I love everything you do! Welcome to the wonderful world of tight-wad gels!! lol!
I’ve been doing gel nails at home for awhile now (and LOVE it!)…A few things I’ve learned: You don’t need their special cleanser. Acetone works to clean the nails before application and use plain ‘ol dirt-cheap rubbing alcohol as the last step (to get the sticky off). To minimize fuzzies from cottonballs/pads, use a piece of paper towel soaked in the appropriate chemical. If you make a mistake, or if you’re doing french tips and need to work a nice white-tip out, use a small paint brush (I bought a cheap e.l.f eyeshadow brush that works great!) dipped in rubbing alcohol to touch up prior to curing.
The best way to remove it (I’ve found) is to SOAK (don’t skimp on the juice here) a cottonBALL in acetone remover, put it over the nail and wrap it up in aluminum foil (I double-up the smaller toes). Let it sit for 15 minutes or so, then gently scrape the paint off with a cuticle pusher.
Also, Walmart sells a gel polish system (SensatioNail by Nailene) that has GREAT colors. I think they’re better than the Gelish colors, though there aren’t as many. But they’re cheap ($9) and right up the road. The basics of the system are a rip-off (small bottles, only sold in kit-form), but you can’t go wrong with the colors!
Wow, awesome! I felt the same way the first/last time I went to the salon for mani/pedis. I just about choked! This is wonderful, what a money saver!
Abby thanks! I love gel nails, but I hear ya, SO expensive! My fiance is in medical school and we only have one income, so gettin pampered isn’t always possible! Maybe Ill invest in a kit as well!
https://coffeebeansandbobbypins.blogspot.com/
I have been blogstalking you for a bit. I love your hair tutorials!I also came to the same conclusion that you did and bought all my gelish stuff just over a year ago. I have learned a few tricks along the way that I thought I would share with you. I didn’t buy a nail cleanser for a really long time. I just used rubbing alcohol to clean the gummy stuff. It worked pretty well too. Also to get the polish off… buff the nail to break the surface seal, take a cotton round cut into 4 and put acetone on it. Put the cotton on your nail and wrap the nail in foil. leave for 5 minutes or so and check on it, the polish should be peeling up. From there it is super easy to take an orange stick and just scrape the polish off. Hope that helps!! I love gelish!!!
I have gel polish and it last forever. I love it. I have used regular polish and it last for a good week, just not as long on my nails.
Yo girl. Love following you! I do my own gel nails too and thought you might like to know the “easy” way to take it off:
1: Use a buffing block and make a quick 2 second pass on each nail (helps break the seal of the top coat)
2: Cut a cotton pad in quadrants (it’s usually big enough to cover the whole nail and end up using less!)
3: Soak the cotton in acetone, place on nail, and wrap in a square of foil.
4: Wait about 15 mins then take off the foil and it should scrape of easily with an orange stick, a fingernail, paperclip…you know, whatever you clean your nails up with. It should basically just fall off but we all need a little help every now and then, eh?
Hope this helps you out!
I recently got gel nails for a wedding I was in and I asked the lady that did my nails how I could take them off so I didn’t have to pay the $8 to remove them or peel them myself and risk peeling more than the gel! She said to dip cotton balls in pure acetone and put one on each nail and wrap each finger in foil. Leave them for about 10-15 minutes. Then take off the foil and cotton ball and use an orange stick to take them off…they should peel right out without damaging the nail bed 🙂 I did it to my nails and it worked like a charm!
Great idea! I once saw a Gel Nail Kit on one of those daily deal sites…might have to keep an eye out in case it pops up again.
DIY Fashion :: https://nellecreations.blogspot.com
Yo girl. Love following you! I do my own gel nails too and thought you might like to know the “easy” way to take it off:
1: Use a buffing block and make a quick 2 second pass on each nail (helps break the seal of the top coat)
2: Cut a cotton pad in quadrants (it’s usually big enough to cover the whole nail and end up using less!)
3: Soak the cotton in acetone, place on nail, and wrap in a square of foil.
4: Wait about 15 mins then take off the foil and it should scrape of easily with an orange stick, a fingernail, paperclip…you know, whatever you clean your nails up with. It should basically just fall off but we all need a little help every now and then, eh?
Hope this helps you out!
I have had great success taking off nail polish and gels with this method … https://gingerbreadmanne.blogspot.com/2010/09/5-minutes-nail-polish-removal-tutorial.html hopefully it will save you some time and effort!
There’s lots of cons with this method posted by gingerbreadmanne. Read through the comments before actually trying – some readers tried and posted what didn’t really work out for them. Also, this method does NOT work with gel nails, which is what the above post from myyellowsandboxblog is for.
Be careful because this removal method is not for removing gel nails, so modify this method of you do have gel nails! Also, before trying, read the comments at the bottom because there are a few cons to this method and the readers that tried posted some good notes on what did and didn’t work very well during the removal process. Also, if you have gel nails, you should just look up a removal method specific for gels since there’s room for error and can potentially be very harmful to your nails and skin if you don’t do it right.